LTO + LTFS FAQ
LTO (Linear Tape-Open) is the drive and tape hardware specification
LTFS (Linear Tape File System) is the tape format specification
Index
- Why tape?
- Archive workflow using LTFS
- Backups of system disks, applications and local documents
- Connecting LTO drives to a Mac
- LTO-10, LTO-9, LTO-8, LTO-7, LTO-6 or LTO-5 Tapes
- Type-M or M8 tapes
- Tape Compression
- Source storage performance affecting tape write speed and tape capacity
- Reduced tape capacity when writing one or two tape copies
- Project, file and path naming
- TAR format
- LTFS format
- LTFS tape labels and formatting
- Changing the tape barcode label
- LTO tape storage
- LTO drive or library temperature and humidity
- LTO drive firmware
- LTO hardware troubleshooting
- LTO tape health and errors
- Accessing LTFS tapes using the Finder or Terminal
- Moving files and folders on LTFS tape
- Deleting files from LTFS tape
- Copying tape to tape, cloning, duplicating or migrating tapes
- Archiving linked files and folders
- Cleaning LTO drives
- Tapes auto mounting?
Why tape ?
Tape has a proven 30 year+ lifetime. It's a stable way to store multiple copies of your
assets.
The LTFS format that is used with LTO tape allows you to share your archives with others
as it's supported on Mac, Windows and Linux.
Your archive is not locked into any proprietary software.
There is an initial investment in the LTO drive, similar to buying around 15 hard
drives. But after that the tapes are very low cost.
Hard drives are OK for short term backup and file transfer.
Always make at least two archive copies and keep them in different locations to protect
against loss or damage.
YoYotta is ideal for this as it can make multiple copies to drives and tapes in
parallel.
Once written, slide the tab closed to write protect the tape.
If the building power is intermittent, invest in a UPS to keep the computer,
external drives and LTO drives powered on during a power cut.
Don't unplug Thunderbolt, SAS or FC cables whilst tapes are loaded.
Never write more files to an existing archive unless you have at least one copy of ALL
the files that have already been archived to that device, just in case there is an issue.
This applies when writing to any type of media, tape or drives.
So do not delete any files from the source until you have archived the last job and
verified all the tapes.
When complete write protect the tapes and then you can delete the original files.
Archive workflow using LTFS
LTFS stores files in a standardised folder structure. This means that tapes can be easily read and
restored using any LTFS software.
You are not locked into one piece of software, because it's an open archive.
When files are rewritten on tape the old files are left behind, so incremental
copies use more and more space.
YoYotta supports spanning of large volumes across multiple tapes, provided they are not
changing.
If files are being added and modified on the source volume, then when complete the
archive will already be out of date.
Also when the job is run again any new files will not always go onto the same tape as
existing related files.
So archiving of large changing volumes where files are being added and modified is not
supported.
Also it's not a good idea to continually write to existing tape archives.
Instead we recommend archiving project by project and also separating incoming
original material.
Once archived, the material never needs to be archived again. Making each project much
smaller.
This also means the LTFS archive can be used for easy sharing of project assets with
other people working on the project in different locations.
If there is an existing shared volume that cannot be split into projects, then do
not do this in one job, instead create smaller jobs of 20 or 30TB.
This way you can ensure that files on shared storage aren't being written by other
users during the archive. Each job will complete sooner, but all the jobs will still end
up in the same YoYotta metadata project.
Here is a suggested workflow for a post-production environment.
- Keep source material, project files and rendered material each in a separate folder.
- Wherever possible link camera material into application projects rather than importing or moving it.
- If possible have two sets of storage, online and near-line. The near-line might be directly attached to the archive Mac computer.
- Create original footage, project and renders folders for each project.
- Inside the footage folder create subfolders for each day or each import.
- When new footage arrives make two copies on LTFS tape.
- If there is a lot of material, then at the same time transcode it to a proxy format for editorial.
- After editorial restore the original footage from tape (With larger projects there is no need to keep it all online).
- YoYotta Conform can take the editorial timeline to selectively restore from LTFS tapes.
- When importing into grading, VFX or online applications, link rather than copy material into the project.
- Create new material (grading, VFX and deliverables) in the timestamped render folders outside the project folder. That way the project is kept small in size.
- Use YoYotta to copy the projects and new material to near-line storage.
- The original footage doesn't need to go to near-line, because you have two tape copies.
- Use YoYotta to archive projects and new material from the near-line to tape.
- As the project folders don't contain material they will be much smaller and a full weekly archive can be run from near-line to a new tape.
- This also means you will build a set of complete snapshots of projects.
- On completion remove projects from online. If there is space, then keep them on the near-line storage for a bit longer.
- The same principle applies to rendered footage, archive shots on a regular schedule.
When archiving if there are application cache or temp folders inside the job, then remove these from the job. See how to set up a selective copy.
To restore you can use the YoYotta Conform option, the Project Browser or job reports to locate files on a tape. Then the files can be restored by YoYotta or any LTFS system.
This makes the archive much more useful. Whereas a multi-tape incremental archive is much harder to selectively restore.
Backups of system disks, applications and local documents
System or boot volumes contain lots of small files, links, devices and caches which
will not copy to LTFS tape or disk. In addition the backup cannot be restored as
a bootable volume.
All your projects, documents and data should be stored on a separate disk volume.
This can be backed up to LTFS along with project media.
Use Time Machine for your system backup.
This way if you have a problem with the computer or need to change computers it will
be very easy to start working quickly as all your creative data will be stored
separately.
Note that Time Machine backups have a special structure and they cannot be copied
to tape.
Connecting LTO drives to a Mac
The LTFS standard requires an LTO-5 or newer tape drive. LTO drives have either SAS or Fibre Channel interfaces.
Our advice is to use SAS drives rather than FC, they are cheaper, they use more durable cables, there is no configuration and SAS gives the same performance.
Or use a Thunderbolt LTO unit which will have a SAS tape drive inside.
There are also 10GbE ethernet LTO units which also have a SAS tape drive inside, avoid these as they are complex, expensive and a dedicated ethernet port will be needed on the Mac.
They are thousands of dollars more expensive, instead purchase a dedicated Mac mini and a Thunderbolt LTO drive. This can be a shared archiving resource by using screen sharing.
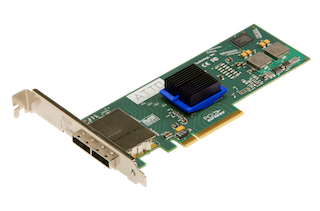
To connect any make or generation of SAS or FC LTO drive to a Mac use an ATTO PCIe interface.
See this link for more details about ATTO interfaces.
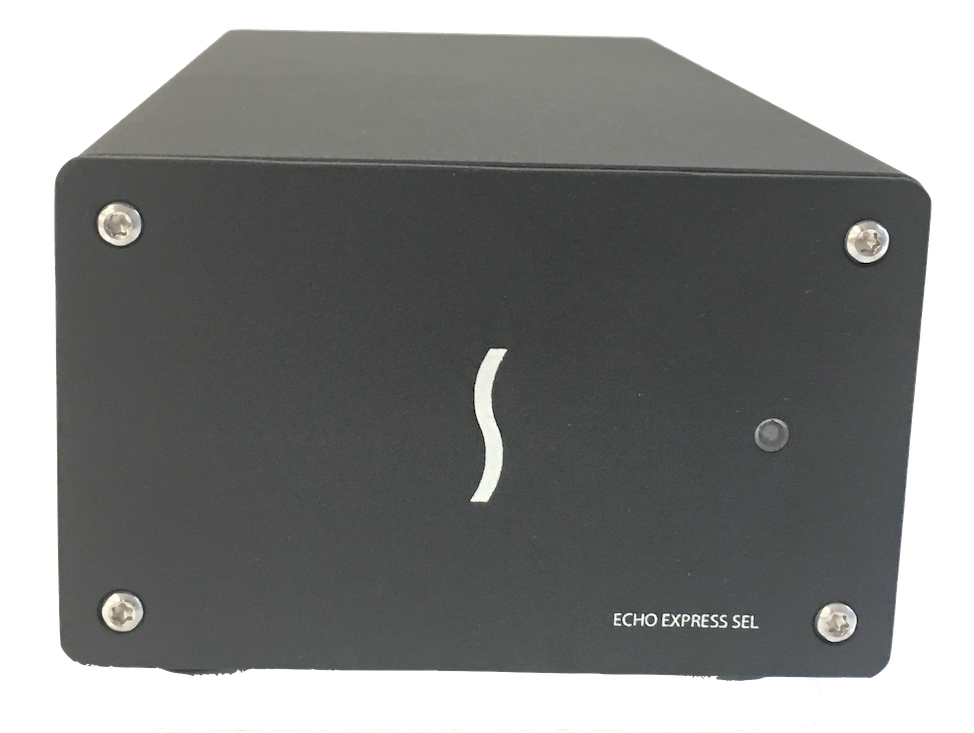
PCIe interface cards go into Thunderbolt expansion units like the Sonnet Echo Express SEL shown here.
A Thunderbolt enclosure holds one or more PCIe cards. Use this to connect to a desktop SAS LTO drive or tape library.
You can also put a PCIe SAS or FC card inside a MacPro. However this is overkill as even an entry level Mac mini connected to a Thunderbolt enclosure will give equal archiving performance.
There are also desktop units from MagStor and Symply that include an internal Thunderbolt to SAS interface so they can plug straight into a Mac.
LTO-10, LTO-9, LTO-8, LTO-7, LTO-6 or LTO-5 Tapes
LTO-10 drives only support the use of LTO-10 tapes.
LTO-9 drives support the use of both LTO-9 and LTO-8 tapes.
LTO-8 drives support LTO-8 and LTO-7 tapes.
LTO-7, LTO-6 and LTO-5 drives will read two generations back. So an LTO-7 drive will read / write LTO-6 and read LTO-5.
LTFS creates a separate partition for indexes that uses around 5% of the
tape. Also YoYotta reserves about 100GB to ensure the tape does not over fill.
LTO-1 to LTO-4 tape drives do not support this extra partition so they cannot be used with LTFS.
LTO-10 tape stores around 29TB and read/write speed is around 250-300MB/s and 350-400MB/s for full height drives.
LTO-9 tape stores up to 17.4 TB and read/write speed is around 250-300MB/s and 350-400MB/s for full height drives.
LTO-8 tape stores up to 11.3 TB and read/write speed is around 250-300MB/s.
LTO-7 tape stores up to 5.6 TB and read/write speed is around 250-300MB/s.
LTO-6 tape stores up to 2.35 TB and are a little faster at 160MB/s.
LTO-5 tape stores up to 1.32 TB and can be read or written at 140MB/s.
Type-M or M8 tapes
Type-M allows new LTO-7 tapes to store up to 9TB instead of 6TB.
Type-M can only be written (and read) using an LTO-8 drive
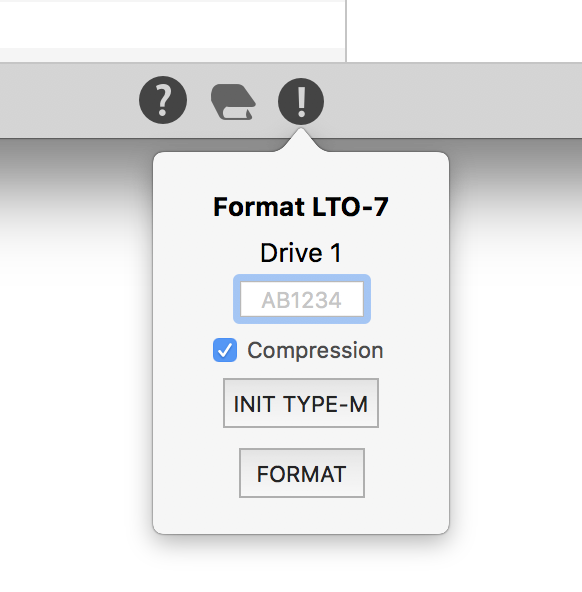
Before formatting YoYotta can initialise new LTO-7 tapes loaded into an LTO-8
standalone drive as Type-M. No need to purchase tapes pre initialised.
The tape barcode should have M8 as a suffix.
Note that once initialised they cannot be used as normal LTO-7 tapes.
In a library ensure the tape has M8 barcode labels and also check that the library
firmware supports Type_M.
The library reads the barcode and initialises the tape automatically on loading into the
drive.
We don’t recommend using Type-M for long term archive as the tapes are only readable
in an LTO-8 drive. It was a short term solution introduced because of previous supply issues with LTO-8 tapes.
For larger archives we suggest using LTO-8 tapes which have now dropped well
below LTO-7 pricing per TB.
Tape Compression
Using tape compression is recommended, internally the LTO drive will compress files that
are uncompressed.
Enable compression when formatting in the LTFS panel. The compression is
lossless and varies from 1:1 to 2.5:1.
Uncompressed files like ARRIRAW, Phantom CINE, DNG and DPX can see a 10 to 20% space
saving and these files will transfer faster.
Virtually all other video files contain compressed codecs like ProRes or H.264 so
there won't be any reduction in size, but it's no slower so we recommend leaving
compression enabled when formatting all tapes.
Also note that there is no risk in using compression, as compressed data is written
to tape in exactly the same way as uncompressed data and on board hardware does the
compress/decompress.
The theoretical ratio 2.5:1 allows the LTO vendors to quote a crazy
compressed figures like 30TB on LTO-8, or 75TB on LTO-10 tapes. Ignore this number.
This would only be achieved with text or other files that compress easily. To put this into context all the published books in the British Library might be about 20TB of text.
The potential compression is unknown until after data has been written, so
the drive will always show uncompressed space.
Some studios may ask for tapes with compression turned off, so check the delivery
spec before formatting.
To help explain this, here is an example.
Imagine you have a folder A containing 100GB of text files on your computer.
You zip the folder to make a new folder B. The size of folder B is 50GB.
You want to make an archive of the files, so you purchase a 180GB hard drive.
Does it matter which of the two folders you store on the hard drive ?
No it doesn't, as the drive does not know if the data is compressed or not.
However you can fit more B folders onto the drive as they are smaller.
So this means there cannot be any issues writing a compressed file to the disk. But it's still your choice.
If you write folder B three times to the drive, does this mean you have written 300GB of data ?
No, you only wrote 150GB, and the space remaining is 30GB.
Does this mean the hard drive capacity is now 300GB + 30GB ?
No, the hard drive capacity can never change, it's always 180GB.
LTO compression works in exactly the same way, the tape drive performs the compression and then writes this data.
The tape is unaware of this process.
Data is read back as normal and then if it was compressed the drive will uncompress it.
Now what about typical video files. If you have a 100GB folder containing ProRes clips and you zip it the size might be 99GB.
This is because the ProRes codec is already compressed.
So you will not be able to fit any more zipped ProRes on a tape.
However there may be a small space saving.
If you have an LTO-9 tape with a capacity of ~ 17TB and you have a folder with 17.5TB of files, will it fit ?
So the only way to tell is to try to write it. If you are lucky and it compresses a bit, then as the drive writes the data, the remaining space will drop a little slower.
Source storage performance affecting tape write speed and tape capacity
YoYotta shows the tape write speed whilst archiving files and then the tape read speed when verifying the archived files.
If the source storage provides a good bandwidth and performance, then the write speed for LTO-7, 8 and 9 will reach 300MB/s.
Don't worry if the speed drops and then resumes, this is completely normal, so don't sit there watching it !
When YoYotta completes the job the average copy and verify speed will be shown in the log.
The average job verify speed for LTO-7 onwards, should be at least 250MB/s as no external storage is involved.
That is unless Double Source Verify is enabled as this will read the source files for a second time during the verification.
Double Source Verify is intended for initial offload from camera cards or where there are no checksums, so it will normally be turned off when archiving.
However if the average write speed is slow this usually indicates an issue with the source performance.
LTO drives perform speed matching, so they can run the tape slower to stay in sync with
slower source devices. However for newer tape generations the minimum speed is higher.
The minimum speed needed to keep the tape writing continuously is 60MB/s for LTO-6, 110MB/s for LTO-7,
120MB/s for LTO-8 and 180MB/s for LTO-9.
With a mix of different file sizes it's good to have a source bandwidth of at least 50% faster than this to keep the job going.
Note that the actual read speed with real files will never match a speed test result, so treat these tests as a rough guide.
Also remember that shared storage may well be used by others whilst the archive is running.
This means that a 1Gb NAS or a single hard drive will not be fast enough as a source.
A 10GbE or faster NAS may work OK, however if the NAS is being used by others at the same time then it's performance will drop drastically unless it's all SSD based.
For example our 10GbE QNAP works fine with a single user archiving reasonably large files.
However with variable sized smaller files like ARRI ARX, then the QNAP hard drive volume is far too slow.
There is an overhead of opening and closing files on disk and over an SMB network connection that becomes more critical with smaller files.
These jobs can also be a challenge for some direct attached hard drive RAIDs.
The SSD volume in the QNAP does work well for these jobs, however as soon as another user starts accessing the NAS then of course the performance drops.
So if the tape write speed is at least 200MB/s there should be no issues.
However if slower than this and the tape drive runs out of data then the tape will have to keep rewinding and start
writing again. You will hear this backhitch or "shoe shining" behaviour if you listen to
the drive. When this happens the average speed will drop drastically. This won't normally damage the tape, however it does increase drive head wear.
When the tape drive retry writes it will end up skipping over tape which reduces the capacity of the tape.
Also when the tapes are remounted the recovered read/write error counts will have increased more than normal.
The verify will probably run slower as the tape drive has to retry the reads of the files.
So with lower performance sources it will need to use YoYotta to copy the archive data from the shared storage or hard disk to a
direct attached Thunderbolt RAID.
Test the source performance by running the same YoYotta job from the source storage to a local SSD or the internal SSD.
You need to see a speed of at least 300MB/s, ideally 400MB/s or more. If slower then this will not be a good source for archiving.
After completing this copy, next check out the system by setting up a new job using the SSD as the source and a tape as the destination.
Compression can increase throughput for compressible data like ARRIRAW and DPX; for already-compressed formats (this includes most camera codecs) expect little benefit
If the source speed is low then use YoYotta to create two sequential jobs. The first to move from the slower source to the RAID.
A Thunderbolt RAID like the Symply SPARK XT will be needed, this should have enough bandwidth and performance to be simultaneously
ingesting from a slower source and also running a tape archive. So the two processes can be overlapped.
Setups like this can be used to archive large jobs non-stop for many weeks with very predictable completion dates.
Reduced tape capacity when writing one or two tape copies
As mentioned above a slow source drive can cause the tape drive to run out of data or under-run so the drive has to skip over tape and the capacity drops.
When this happens often the recovered write count will increase. Then when verifying or restoring a tape if the drive needs to retry the read several times then the recovered read counts will increase.
After a job you can remount a tape and then compare the read + write statistics shown in the YoYotta popup log to see if they have increased greatly.
Some clients might request different tape brands, this is unnecessary.
As whilst there are at least four LTO tape brands there are only two actual LTO tape manufacturers so you may or may not be using different makes.
So for consistency and repeatability stick to the same brand for all archives for a particular job.
Note that when ordering stock we have always seen that the tapes supplied come from a mix of different manufacturing batches and dates.
When writing to two tapes in two drives in parallel then tape stock and tape drive differences can cause the capacity for one tape to drop faster than the other.
In normal operation this should not happen. So ensure that both tape drives have the same firmware, also ensure that one drive is not a lot older than the other.
If you do find that one tape / drive runs out of space well before the other then we suggest running separate test jobs using a fast RAID source.
Write a few TB of data to tape using each tape drive and compare the job write speed, verify speed and remaining capacity after the job completes.
The write speed is dependant on the source speed as well as the drive performance. For LTO-7 onwards this should regularly run at 300MB/s, dropping down periodically.
The average speed at the end of the job should be around 250MB/s. If it's much lower then it's probably a slow source drive.
The verify speed is more independent as YoYotta is reading the data and then generating a checksum.
Also remount the tape and compare the tape health before and after running the archive. If you see poor performance then try reformatting and swapping the tapes between the drives.
Seeing if the issue moves to the other drive will quickly show if it's a tape stock or drive issue.
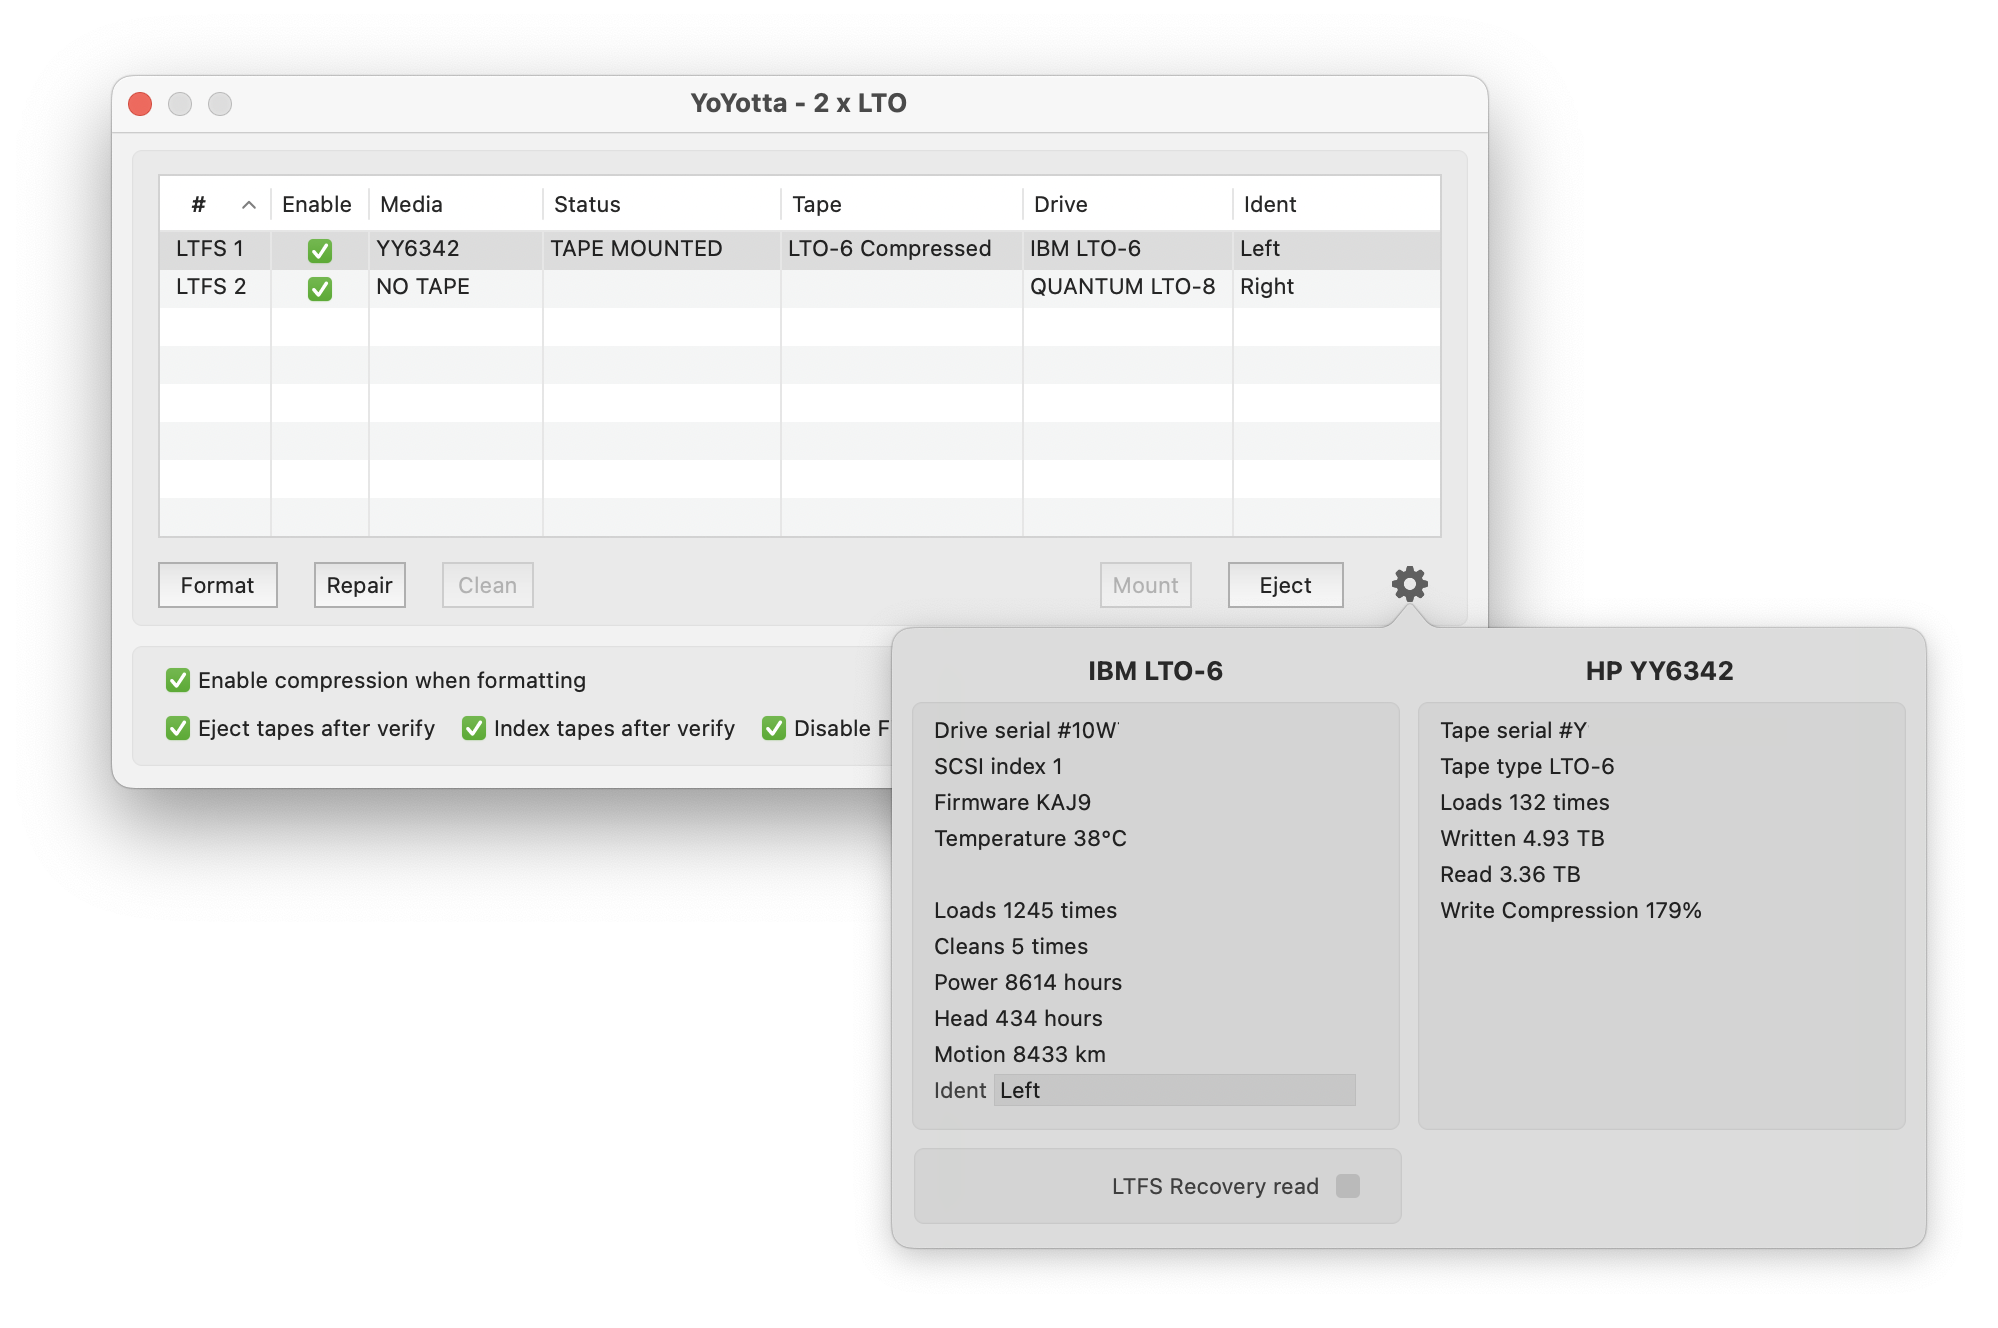
YoYotta v4 shows the power on and head usage for each tape drive. Also YoYotta shows the temperature (and for LTO-9/10 the humidity) which is important. You will find detailed information about health, temperature and firmware on this page.
This FAQ page, like the rest of the YoYotta support pages, is continually updated so please make sure you read every section. If you're not getting anywhere then please contact us at support@yoyotta.com, including the YoYotta log + debug.
Project, file and path naming
For any data workflow, to ensure portability and acceptance by all applications and studios only use the following characters. This means no spaces. To enforce this turn on Strict file and folder naming in Preferences
- Alphabetic Characters [A-Z, a-z]
- Numeric Characters [0-9]
- Underscore [_]
- Hyphen [-]
- Full stop [.]
When this option is turned off then virtually all characters including accents can be used.
Note that on the Mac the : (colon) character cannot be used. Also it's not
recommended to use the / as it is not supported by Linux and Windows. If used it will
appear as a colon.
As LTFS tapes are an archive and can be used cross platform it is best to avoid all
the characters shown in the list below.
- macOS :
- Linux /
- Windows \ / : * ? " <> |
macOS and Windows file names can be up to 255 unicode characters in length including the
file extension.
However Linux and LTFS support a shorter maximum of 255 8-bit characters. Unicode
characters can be made of multiple 8-bit characters, so some files with valid names on macOS
cannot be written to NAS, Linux file systems or LTFS tapes. YoYotta will warn about this.
So keep file names less than 250 characters and path names less than 1024 characters.
After indexing open the Source Browser and files with issues will have a red status.
Edit the file names or zip the files, then reindex the job.
TAR format
TAR is an older method of storing files as a bundle on a tape. There is no directory and the tapes cannot be mounted on the desktop. This makes it harder to retrieve individual files. YoYotta with LTO tape option supports reading of most TAR tapes, this allows easy migration to LTFS. More information about restoring TAR tapes.
LTFS format
LTFS is an open standard file system, the current format version since 2017 is 2.4.
Before that the format version was 2.2, these tapes can still be read. Tapes written can
be read by LTFS running on Linux, macOS or Windows. So it's a cross platform archive.
Older LTFS versions can still be read back. Tapes are formatted with a 6 character
label, that matches the barcode label.
After formatting this label cannot be changed. To rename you will have to
restore, reformat and copy the data again. LTFS stores the tape label in multiple
indexes and also inside the tape chip memory.
Do not use / * ? <> " | \ : characters as these are not supported when the LTFS tape
is mounted on a Windows system.
Keep file names less than 250 characters and path names less than 1024
characters.
LTFS does not support the use of WORM LTO data tapes. This is because WORM media cannot be partitioned and formatted which is necessary for LTFS.
LTFS tape labels and formatting
LTFS tapes must be formatted with a unique 6 character code. The code can have the
letters A-Z and numbers 0-9 in any order, for example 123456, ABCDEF, YO1234, 17376A.
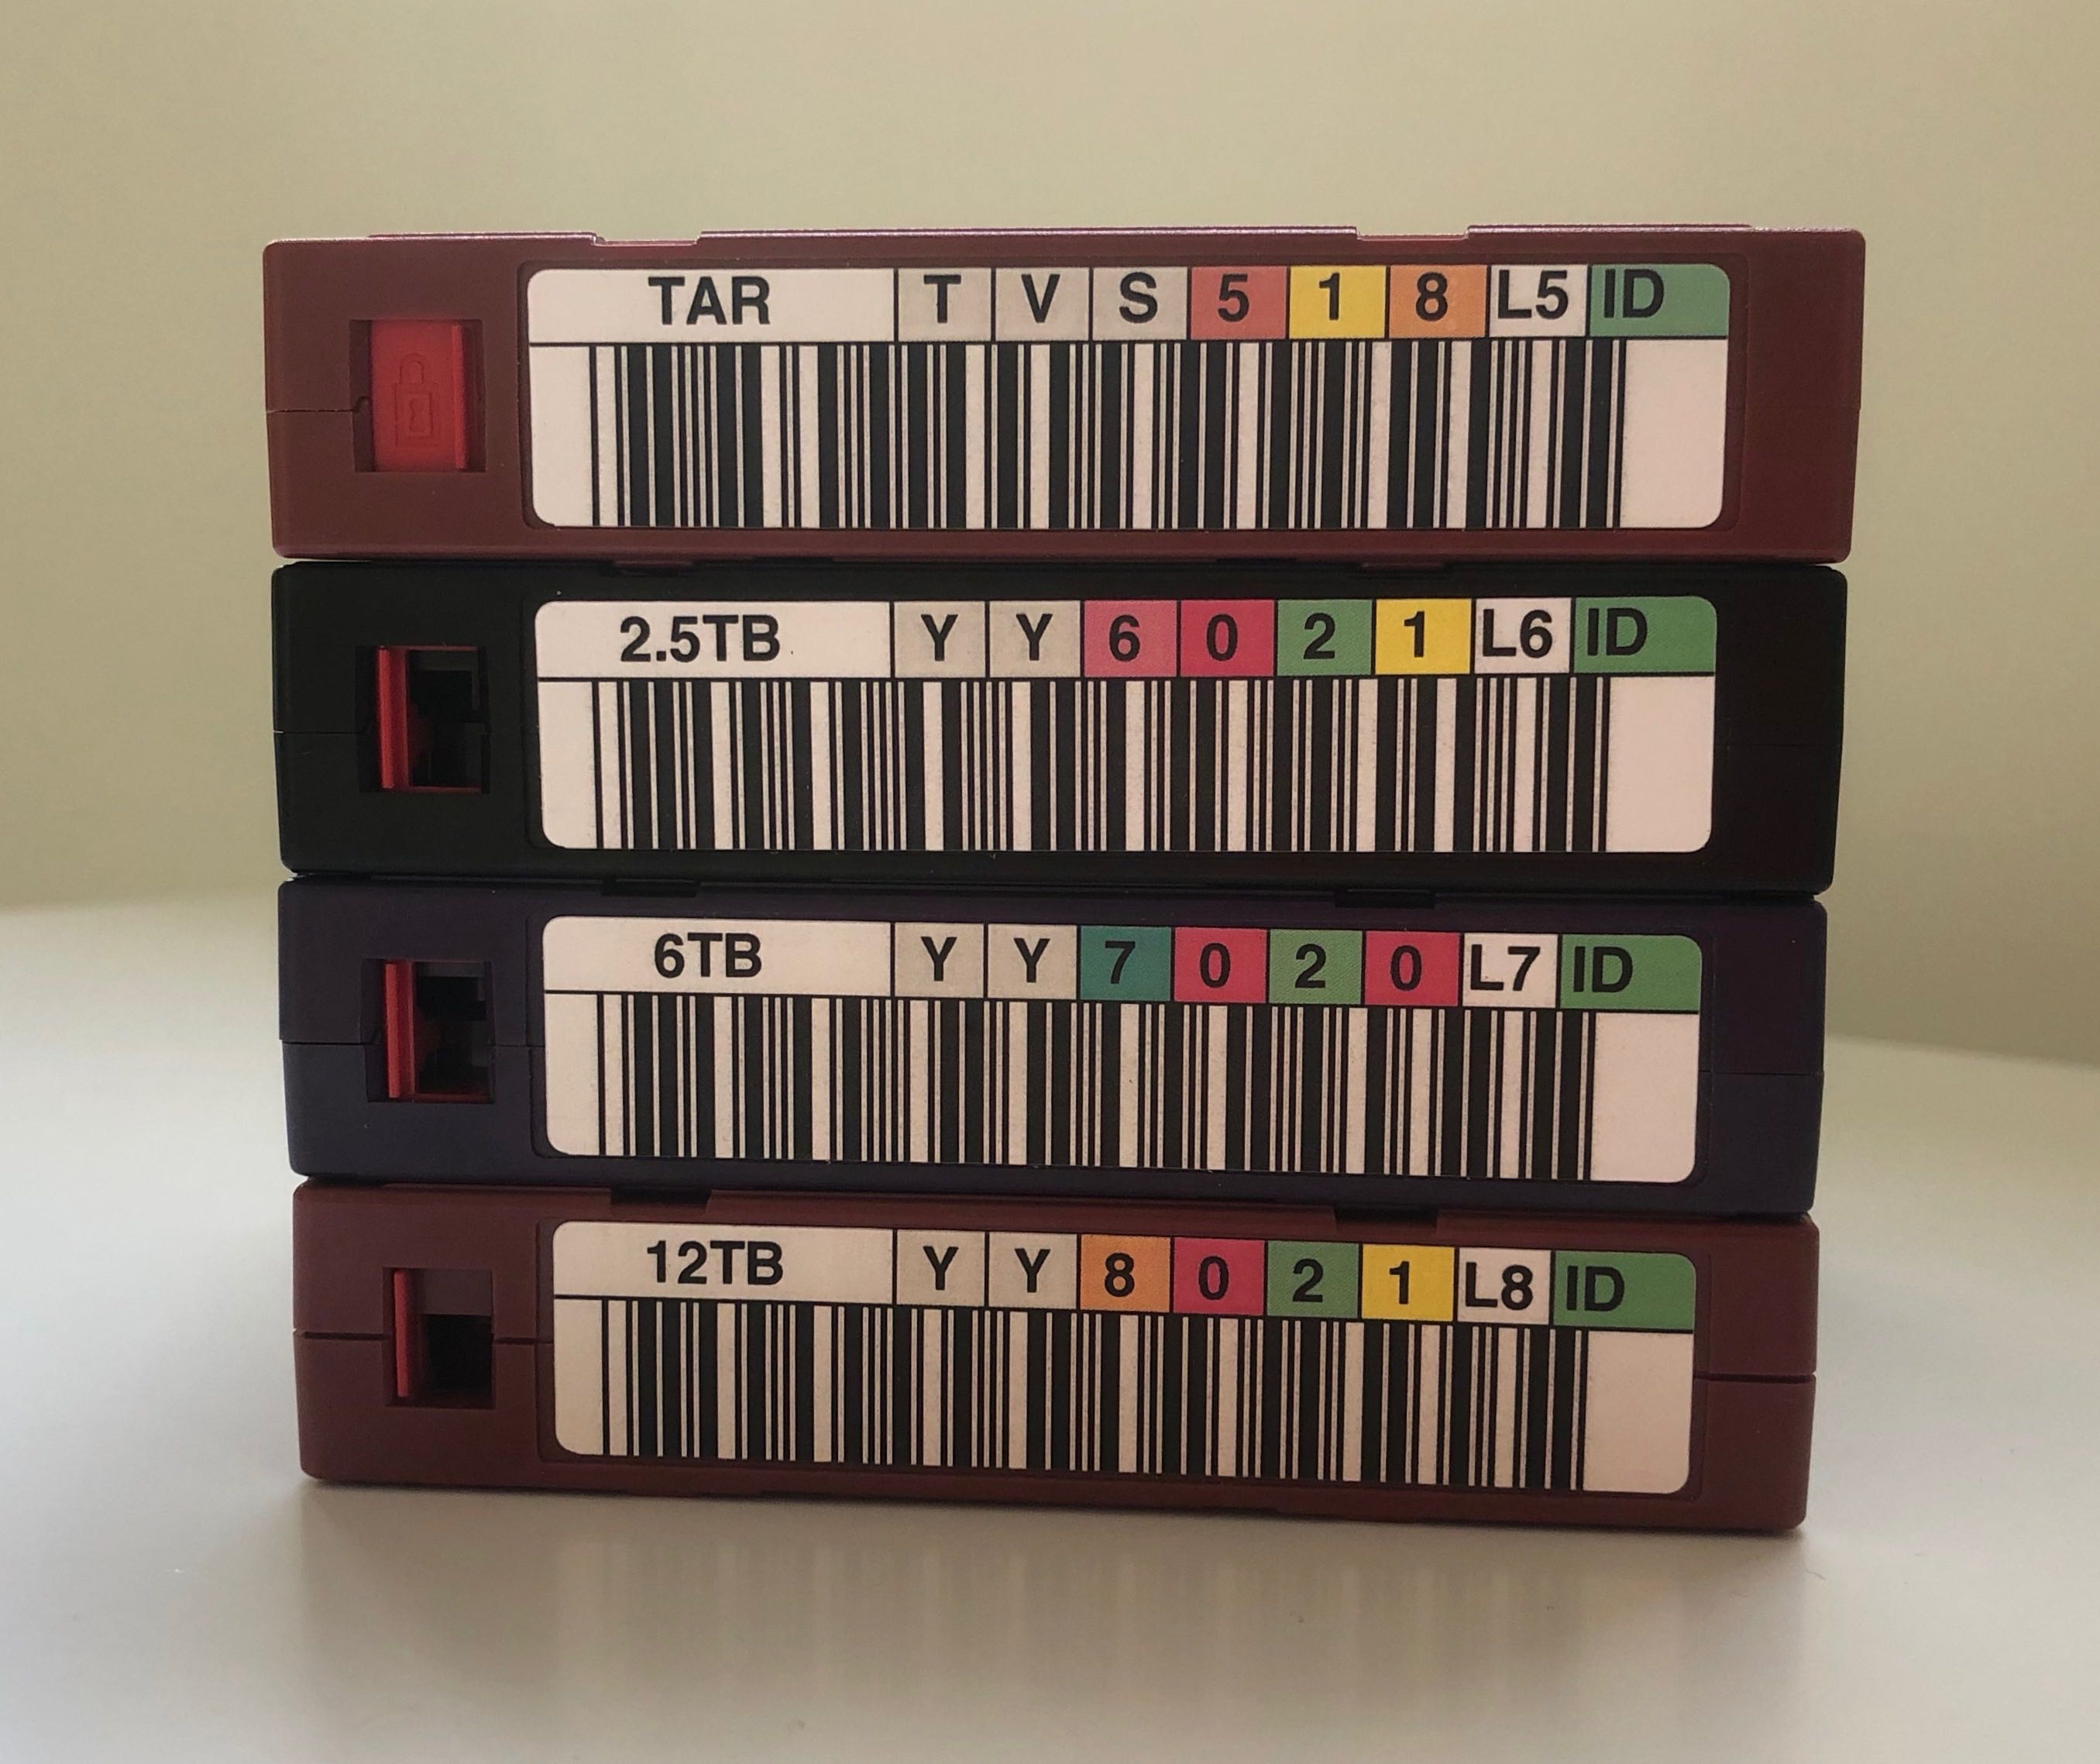
The tape barcode label is 8 characters, which is the user selectable 6 characters with
either L5, L6, L7, M8, L8, L9 or LA on the end for LTO-5, LTO-6, LTO-7, LTO-M8, LTO-8, LTO-9 or
LTO-10 tapes. For example 123456L5, ABCDEFL6, YO1234L6, 17376AL7. The six characters from
the label must be used for the six digits when formatting.
Do not add any checksum or check digit.
It's best to use barcode labels for all tapes, this means that they can be used with
an LTO library. Also barcode labels are an easy way to identify tapes.
Do not use the same 6 characters for copies of tapes
Do not use CLN as the first three characters as this prefix is reserved for
cleaning tapes
Always make two copies of all material. One Main and one Safety (or clone) tape.
YoYotta will decode the barcode and show Main or Safety when
selecting destination tapes, this can be ignored if you are not using one of the
conventions below.
There are three suggested conventions for labelling main / safety tapes.
Odd/Even numbering YT0111, 127633, XTM127 are main tapes and YT0112,
127634, XTM128 are the matching safety tapes.
A-M / N-Z as the 5th letter HRSMDA, HRSMDB and HRSMDC are main tapes, HRSMQA,
HRSMQB and HRSMQC are the matching safety tapes. This method allows 4 letter project
codes (in this case HRSM) and 13x26 main and 13x26 safety tapes.
A/B as last character ABC12A, YY100A, H2122A, SHOW1A and 12567A are main tapes, ABC12B,
YY100B, H2122B, SHOW1B and 12567B are the matching safety tapes.
Six user selectable characters allow more than 2 billion unique combinations, so do not use longer barcodes. Longer barcodes may be truncated and then the tape label will no longer be unique.
Ensure the last two characters are Ln where n is the tape generation, for example L7, L8 or L9. If this suffix is missing then these tapes may not load when using tape libraries.
Changing the tape barcode label
After formatting it is difficult to change this label, as it is written to the tape and also written to the chip inside the tape cartridge. The easiest way is to reformat the tape using a different code.
If you are confident using the terminal, then here is the procedure to change the tape name.
Unmount any other tapes. Mount the tape and then open the Apple terminal and then type the following to list the mounted volumes, there will be one volume with LTFS as a prefix.
Then type the following two commands, here the new barcode is NEW001 and the old barcode is OLD001 with a mount volume name of LTFS_XXYYZZ1234_OLD001
xattr -w ltfs.mamBarcode NEW001 /Volumes/LTFS_XXYYZZ1234_OLD001
xattr -w ltfs.volumeName NEW001 /Volumes/LTFS_XXYYZZ1234_OLD001
Now eject and remount the tape and check that YoYotta shows the new barcode.
Then index the tape and store a new snapshot using these instructions.
LTO tape storage
Keep your working tapes in the same room as the drive or library. If this is not possible
then ensure they are in the room for 24 hours before use. This will allow the
temperature of the tape to match the temperature of the drive.
The room temperature should be between 16 to 32°C with 20 to 80% humidity. This
is a wide range, however it is important to keep this stable. Rapid changes in
temperature or humidity are not good for electronic equipment.
Keep tapes in their cases and ensure that they are protected during shipping.
LTO drive or library temperature and humidity
Ensure a good airflow around the tape drive or library. The room temperature should be between 16°C and 25°C, the humidity between 20% and 80%.
The number displayed for the drives is the exit air temperature, so this will be warmer than the room temperature.
Try to keep it below 35°C, however the important thing is the rate of change.
So make sure that the temperature or humidity is kept constant, not dropping or rising rapidly.
As this can cause drive read and write issues.
With YoYotta v4 select a tape drive and click the cog button at the bottom right of the tape drive table in the LTFS panel. YoYotta will show the drive hardware status including the internal temperature.
For LTO-9 and LTO-10 drives the humidity will also be shown. Note that the temperature sensor monitors the air exiting the drive. So it will be higher than the room temperature.
With YoYotta v3 hover the mouse over the LTO generation displayed in bottom right of each drive box in the LTFS panel and a tooltip will show the temperature.
It is very important to make sure tape drives are in a stable temperature and humidity environment.
LTO drive firmware
To check the LTO drive firmware version, open the LTFS panel and select the drive then click the cog button at the bottom right of the table.
The drive firmware will be shown as a 4 character code like Q3A1. See the screenshot above.
If you have multiple drives of the same generation they should all have the same firmware. (This especially helps when archiving to two tapes in parallel)
To update the drive an IBM command line utility called ITDT is used.
MagStor have a great support page describing how to update LTO drive firmware
They also have a page with firmware files for different generation tape drives.
LTO hardware troubleshooting
Problem creating folder 'Read-only file system' (30)
Error 30 means that the LTFS filesystem detected too many write errors so it has switched to a read-only mode to protect the tape.
Try ejecting the tape and power cycling the tape drive.
Then remount the tape and open the YoYotta log panel and check the write error counts shown for the tape.
If the error counts are high then run some tests with a new tape and see if this works OK.
If there are issues with multiple tapes then this indicates that your tape drive may need servicing.
It may be worth updating the tape drive firmware as described above and then running tests again.
Problem writing file 'Socket is not connected' (57)
Check Source Media Problem (6, 'Device not configured') opening file
Problem reading/writing file 'Input/output error' (5)
If archive or restore jobs stop and errors like these appear in the popup YoYotta log, first check that the path in the error includes LTFS.
If it does not then you need to check the source or destination drive, NAS or SAN. Try unmounting and remounting the storage device.
Errors like these are low level issues sent from macOS that do not give much more information other than reading from or writing to the tape has failed.
There could be a temperature or humidity issue, check the section above for more information.
To work out if it's the tape cartridge or the tape drive load a new tape and write some write and read tests.
If the new tape works OK then the issue could be a damaged tape. Load the original tape and run the job again. See if the error happens with the same file.
If the new tape also has issues then it could be a SAS/FC interface or LTO drive issue. To troubleshoot follow these steps. This is specifically for ATTO hardware, but it is a similar process for other SAS interfaces.
- Eject all tapes
- Download the ATTO360 Storage app, driver and Flash Bundle from the ATTO website
- Install ATTO360 Storage and also update the macOS driver
- Run ATTO360 Storage and update the card flash firmware
- Power off the drive and Mac, then turn everything back on
- Run some test archive and restore jobs from a local or internal SSD using a new tape
If these tests run OK and you were restoring, then try restoring again.
If the error happens again at the same file then remove this file from the job by setting up a selective restore.
Repeat this process until all files apart from the corrupted ones have been restored. Then write a new tape.
If you were archiving, reformat the original tape and try again.
If there are any issues open ATTO360 Storage and click Run Diagnostics in the Help menu. This will take some time to collect and save diagnostic logs.
Also save a copy of the YoYotta log + debug as described here
Then send both logs to support@yoyotta.com and we will help you troubleshoot the issue.
Alternatively contact the supplier of the LTO hardware so that they can run tests.
If the LED display on the front of the drive shows a number check this information.
LTO drive LED display code 1
Temperature problem. Check the section above about drive temperature
LTO drive LED display code 3
A rare error. The tape drive determined that a firmware error occurred. Eject the tape and try power cycling the drive.
Then try a test job, if still an issue then check the firmware version.
See the section above about drive firmware
LTO drive LED display code 5
Tape drive hardware problem. The drive determined that a tape path or read/write error occurred.
To prevent damage to the drive or tape, the tape drive will not allow you to insert a cartridge if the current cartridge was successfully ejected. The error code may clear when you cycle power to the tape drive or place it in maintenance mode. If the problem persists, contact your supplier.
LTO drive LED display code 6
Tape drive or media error. The tape drive determined that an error occurred, but it cannot isolate the error to faulty hardware or to the tape cartridge.
Ensure the tape cartridge is the correct media type for the drive.
If the problem occurred while the tape drive was writing data to the tape, retry the operation with a different tape.
If the operation succeeds, the original cartridge was defective. Copy data from the defective tape and discard it.
If the operation fails and another tape drive is available, insert the tape into the other unit and retry the operation.
If the operation fails, discard the defective tape.
If another tape drive is not available, then contact the supplier of the drive, so they can run hardware tests.
If the problem occurs with multiple tapes, then again contact the supplier of the drive.
LTO drive LED display code c
Media optimisation will be performed the first time an LTO-9 tape is loaded.
A small c for characterisation will appear on the LED display on the front of a standalone LTO drive.
This process usually takes 40 minutes, but can take up to 2 hours.
LTO drive LED display code C
The tape drive needs to be cleaned. Load a cleaning tape into the drive. It will be ejected when cleaning is complete.
LTO tape health and errors
Tapes can be re-written hundreds of times, so for typical archive workflow there should
not be any issues.
The LTO drive monitors tape read and write errors. The error count is stored in a memory
chip inside the tape cartridge. When the tape is loaded YoYotta reads the error count.
The error count cannot be reset so the history of previous errors is never lost.
These errors will not be fixed by the repair function, which is used if a tape does not mount because of a missing or corrupted tape index.
Recovered errors
When writing sometimes retries are needed and the drive rewrites the data further
down the tape. This reduces the capacity of the tape very slightly. These are logged as
recovered write errors. Low numbers of recovered write errors are no problem even with a new tape,
however large counts can indicate poor tape quality or a drive issue. Recovered read
errors indicate that the drive needed to retry the read, again low counts are normal.
But high rates in the hundreds or thousands indicate a problem with the tape or drive.
If a tape shows a high recovered error count mount it and note the error counts
from the YoYotta popup log. Now run a full restore to a local RAID. The restore will
automatically verify the tape so see if there are any issues. Afterwards remount and see
if the count has increased. If there are verification issues or the count increases by a
lot it will be best to make a new copy of the tape. If the tape restores OK and the
counts are similar then it is likely that the tape has been used in another drive that
has hardware issues.
Make sure the temperature and humidity of the room is kept consistent.
Permanent errors
These errors are logged when a read or write to tape fails. The read or write job
will appear to have hung however the drive will keep retrying for 20 minutes so just
leave it to finish.
They will also occur if the drive is disconnected or powered off whilst a tape is
loaded. Each error may cause a file to be unreadable, however it is possible that the
file has been rewritten so the affected area of the tape will no longer be used.
Permanent errors can also be caused by a drive or interface hardware issue or damage to
a tape. For example if a tape is dropped the edge can be damaged causing some parts of
the tape to become unreadable. A tape with permanent errors can still be mounted unless one of the errors happened to be in the tape header or index.
To check the tape it's best to run a full verification. See Verifying LTFS Tapes
As long as you have at least two verified copies stored in different locations
and look after the tapes then the chance of data loss is extremely minimal. Much safer than long term storage of data on other mediums like SSD or HDD.
We suggest that you do not continue to use a tape with multiple permanent errors or
hundreds of temporary errors. If you have another tape with this data, replace the
original with a copy. If this is the only copy then restore the data and create another
copy.
If you create another tape and it also has problems, then there may be an issue with
the drive.
If there are errors restoring a file then YoYotta will log the file that cannot
be read in the popup log. Locate the safety copy of this tape, open the Source Browser,
then set up a selective restore job just for that file. If you don't have another copy
then instead set up a selective copy just for the file that is having issues and turn on
Recovery Read in the LTFS setup panel. YoYotta will attempt to read the file in
small parts, so it will take a very long time. That is why you only want to use this
mode to recover a few files and turn it off afterwards.
There is no technical requirement to reverify tapes that are in storage.
Whenever you restore from tape YoYotta will reverify the files. You can also run a full
verification at any time.
See Verifying LTFS Tapes
Reformatting the tape does not clear these errors and is not a solution for a
bad tape. If a tape was written and verified without error and then later on when
reading back errors occur this indicates that the tape may have been damaged or the
drive is faulty. Monitor the error counts when mounting tapes, if multiple tapes are
affected then it's likely that the LTO drive needs servicing.
If the permanent error was related to a hardware issue with a tape drive then the tapes can be reformatted and reused.
A YoYotta full verification will check that all files can be restored.
After about 4 years of daily use, LTO drive heads can wear causing the drive
to skip over tape, files are written OK, but the tape capacity is reduced.
Accessing LTFS tapes using the Finder or Terminal
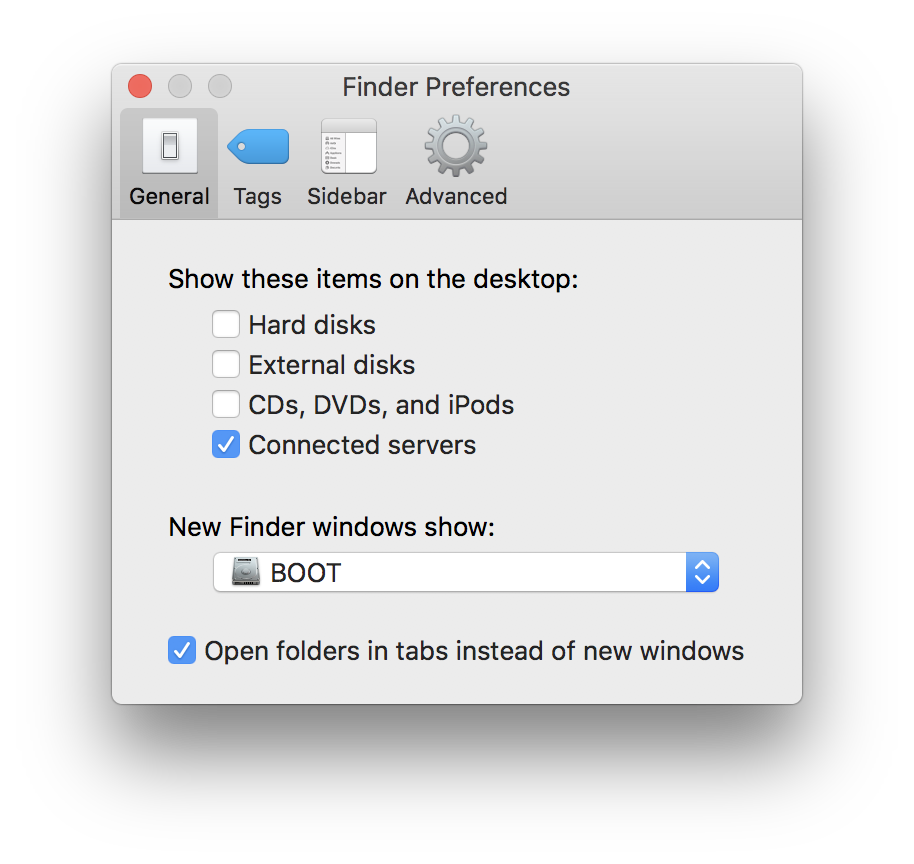
When mounted by YoYotta the tape will appear in the Finder (Finder, Go, Computer).
The tape icon will appear on the desktop if Connected Servers is turned on in
Finder Preferences.
You can browse the tape and this will be quick as long as there are only folders on
display. When navigating into folders with files then this will get very slow as the
Finder tries to create thumbnails and metadata.
It is possible to drag and drop folders and files on the tape using the Finder, but
there is no verification and also the file creation and modified times will not be
preserved.
If the Mac sleeps after a Finder or Terminal transfer then the files written
to tape may be lost.
There are also other technical reasons, so using the Finder is not recommended
or supported.
YoYotta should not be used to mount tapes for any external transfers.
When LTFS tapes are mounted you may see the busy cursor when opening the
macOS File Open panel in other apps.
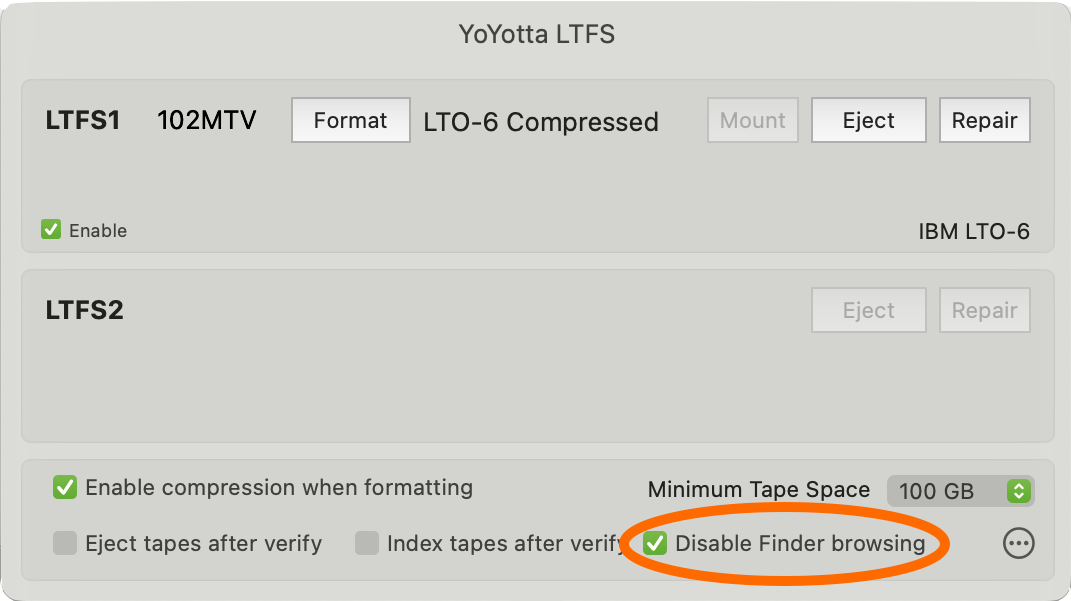
Turn on Disable Finder browsing in the LTFS panel and then tapes will not
show up in any Finder windows. This will speed up non tape file and folder selection in other apps
including the Finder.
If you need to access a tape without using YoYotta then you can type the
following into a terminal window. These commands will mount the tape in the first tape drive and then list the files at the base of the tape.
Then unmount the tape. The terminal app is located in /Applications/Utilities
ltfs -o devname=0 /Volumes/LTFS1
cd /Volumes/LTFS1
ls
umount /Volumes/LTFS1
Whilst mounted the tape will appear in the Finder. There is also an eject button in the Finder.
Moving files and folders on LTFS tape
Files can be moved using the Finder. Files and folders can be renamed. Folders
cannot be moved on tape.
However moving or renaming files will mean that the reports and indexes will no
longer be correct for the tape.
Immediately after making any changes unmount the tape.
Then remount and store a new index using the Source Browser. See Indexing Tapes
Then afterwards export new reports from the Project Browser.
Deleting files from LTFS tape
To delete items from a tape use the Finder. Any files or folders that are deleted from tape using the Finder or command line will be
removed from the tape directory.
However, the space is not recovered, so for
this reason there is no delete function in YoYotta. If a large number of files need to
be removed, then it is best to reformat the tape and start again. Files can be moved on
tape, but folders cannot. So it is best to organise the structure on the source drive
and also set up the destination paths before starting the job. It is also possible to
create an empty folder on the source and link files and folders into it. Then turn on
Copy linked files and folders in the Preferences panel.
Immediately after making any changes unmount the tape.
Copying tape to tape, cloning, duplicating or migrating tapes
YoYotta does not encourage copying from one tape drive directly to another tape drive.
Here are some reasons why this is discouraged.
- If the tapes or drives are mismatched in generation or age then the tape read speed may not match the tape write speed. This can lead to data over or under run, a drive will try to match write speeds but there are limits to this. When drives under-run some tape is skipped, which reduces the capacity.
- When YoYotta indexes the source tape it won’t extract full metadata unless the tape was written by another YoYotta system. (because this would involve reading back each clip which takes a very long time from tape)
- If the tape has been written out of order (which is quite common when written with 3rd party software) then YoYotta will have no choice but to replicate the same order.
Here is a suggested duplication or migration workflow.
First restore the tape to a local RAID. Add the restored folder as a new job, YoYotta will
index and extract full metadata from the files, a snapshot can be saved. Then a new copy can be made in a clean efficient order. If
you are just copying one tape then it will take a bit longer, but the benefits outweigh the extra time.
If copying multiple tapes then after restoring the first tape you can overlap the
archive and the next restore by running simultaneous jobs using multiple tape drives.
With a tape library multiple restores can be queued up.
If there is limited space on the local RAID then the job can be split into several parts using the Source Browser.
However if you have tested the workflow then you can still add a tape as a
destination and copy directly from one to the other.
Mount the tape manually using the controls in the LTFS panel, then click
Choose Other, add the tape as a destination and run the job.

Archiving linked files and folders
YoYotta can archive linked files and folders or symlinks. The linked material can be the tape
or it can be on another volume. If the link points to another volume then when the tape is
restored the link will be recreated.
However it can be easier to remove the links and copy the linked material instead. This
will make the archive larger, but it will be self contained and can be restored anywhere. To
do this turn on Copy linked files and folders in the Preferences panel.

Cleaning LTO drives
The read/write heads on an LTO drive need to be cleaned periodically. Loading a cleaning
tape into the drive starts an automatic cleaning process that takes a few minutes.
So make sure you have a cleaning tape, as once the drive says CLEAN NOW it must be
cleaned. The cleaning tape can be used about 50 times. Before and after cleaning YoYotta
will show the remaining clean count.
When cleaning is needed a standalone drive will show a C on the front panel
display. A tape library will show a warning on the front panel. For both drive types
CLEAN SOON and then later on CLEAN NOW will appear in the LTFS panel.
If the drive ejects the cleaning tape and shows error code 7 then the cleaning
tape has expired and needs to be replaced.
When CLEAN SOON appears there will be a few days before CLEAN NOW appears.
When CLEAN SOON appears, if there are queued jobs in the table after the current
job, then click the start button for each one to dequeue them. Then when the current job
completes run the clean. After cleaning is finished, click the start button for each job
to resume the queue.
Desktop drive
Load the cleaning tape and cleaning will start automatically.
LTO library drive
Load a cleaning tape with a CLN barcode label.
Select the drive in the LTFS panel and click CLEAN to
clean the drive.
In the LTFS panel you will see the number of cleans remaining for the cleaning tape.
Cleaning tape barcode label
The IBM spec states that the cleaning tape barcode label starts with CLN followed by
one alphanumeric character and two numbers. With L1 as the tape type.
The important thing is to make sure the barcode label starts with CLN.
Examples are CLN001L1, CLN002L1, CLN003L1, CLNU01L1.
Tapes auto mounting?
YoYotta does not automatically mount tapes unless a job is running. It is best to wait
until the tape is needed before mounting.
If you want to see what's on a tape see Indexing LTFS
tapes.
Some other apps have this auto mount "feature". If a tape mounts automatically, (it
may appear mounted with ltfs in the name) then you must disable this. Tapes
mounted by other apps may not be recognised by YoYotta.
Retrospect can be disabled in System Preferences.
Codex has an Auto Mount Tapes switch in their preferences. Turn this off.
When all YoYotta jobs complete, all tapes will be unmounted, this ensures
that the tape indexes are updated and helps protect their contents.